

Are you searching for a answer about How to Move a Domain Without Losing Its SEO Value? Migrating a website to a new domain is a major undertaking that can affect your search rankings and traffic if not handled carefully. Search engines see a domain as a central part of your site’s identity and authority. When you change that identity, you must help Google, Bing, and users understand that the site has simply moved, not disappeared. With a well-planned migration using the right tools—Google Search Console, sitemaps, and permanent redirects—you can preserve nearly all of your SEO value. This guide walks through every step of a safe domain move, for both WordPress and custom sites, and covers planning, execution, and post-launch monitoring.
How Domain Migration Affects SEO
Changing your domain means all of your URLs will change. Even if the content and page structure remain the same, search engines must learn that every old URL now lives at a new address. Without proper signals, the search index might see the new site as a brand new site with no history or authority. In practice, a domain change often causes a temporary drop in rankings or traffic as Google re-crawls and re-indexes the site. This is normal. What matters is that you implement SEO best practices during the move so that search engines transfer your site’s authority to the new domain.
The most important signal is a 301 (permanent) redirect from each old URL to its new URL. A 301 redirect tells search engines that the page has moved permanently, and search engines will pass nearly all the ranking signals (link equity) from the old page to the new one. Google’s own guidelines note that 301 redirects (and other server-side redirects like 308) do not reduce PageRank, though you may still see brief ranking fluctuations as the new URLs get indexed. In other words, if you do everything correctly, the SEO value should follow the site to the new domain.
However, other factors can cause problems: broken redirects, missing pages, misconfigured sitemaps, or forgetting to update internal links. Even external links from other sites must be considered; it helps to reach out and ask high-value linking sites to update their URLs if possible, because persistent links to the old domain can confuse Google’s understanding of your site’s canonical identitylumar.io. Finally, any crawl blocks (like a robots.txt disallow or a noindex tag) left on the new domain will prevent Google from seeing your pages.
Key takeaways on impact:
-
Temporary ranking fluctuations are normal. Allow a few weeks for Google to reprocess the move.
-
Permanent 301 redirects preserve SEO equity. Google passes signals from old URLs to new ones. Don’t use temporary (302) redirects for a domain move.
-
Plan for drop/recovery. Even though link equity transfers, visits and impressions may dip for a time as the change propagates. Monitoring and adjustments help a quick recovery.
-
Keep old site accessible. Maintain the old domain (with redirects) for at least a year, ideally longer, to catch users and bots still referencing it.
Planning Your Domain Migration
Thorough planning is critical. Start by auditing your current site and preparing the new domain before making any changes live. This ensures a smooth transition with no last-minute surprises.
-
Back up everything. Create a complete backup of your current website, including all files and databases. This allows you to revert in a worst-case scenario and provides a reference for content and URLs.
-
Inventory your URLs and SEO data. Crawl the old site or review your existing XML sitemap to list every page URL. Save reports of current rankings, organic traffic by page (from Google Analytics or Google Search Console), and note any high-value pages or keywords. This inventory serves as a reference for testing and comparison after the move.
-
Check new domain health. If you are moving to an existing domain (rather than registering a brand-new one), investigate its history. Ensure the new domain has no penalties or bad reputation (use tools like Google Search Console and third-party link analyzers). Buying an expired domain for a move offers little SEO advantage unless that domain has relevant, good-quality links and a clean history.
-
Decide timing. Pick a time when traffic is naturally lower (overnight or weekend) so any hiccups affect fewer visitors. Coordinate with your team to be ready to troubleshoot immediately after launch.
-
Set up a staging environment. If possible, build the new site on a staging server or preview domain. This lets you prepare the site and test migrations (redirects, link updates) before going live, without risking downtime or crawl issues on the live site.
Step-by-Step Migration Guide
Follow these steps to move your site and preserve SEO. The order is important: verify the new site’s readiness before you switch the domain publicly.
-
Setup the new domain and website copy.
-
Register/point the new domain. Purchase the new domain and point it to your web hosting. If using HTTPS, install a valid SSL certificate on the new domain.
-
Copy your site content. Move all website files and databases to the new domain. For WordPress sites, you might use a migration plugin or duplicator tool to copy files and database. For custom sites, export/import databases and update configurations as needed.
-
Update site URLs. In the new site’s configuration, set the site’s URL/domain to the new one. For WordPress, update the Site Address (URL) and WordPress Address (URL) in Settings. For frameworks or custom CMS, adjust any base URL settings. This ensures the site generates links using the new domain.
-
Check for crawl blocks. On the new site, remove any development-specific blocks. If your staging site had a “noindex” meta tag or disallowed Googlebot in robots.txt, delete or update these so that the live site can be crawled and indexed.
-
-
Verify both old and new sites in Google Search Console (GSC).
Add and verify the new domain in Google Search Console (and Bing Webmaster Tools if used). Also confirm that the old domain property is verified (if not already). Make sure to verify all variants: HTTP and HTTPS, with and without “www,” if applicable. Use the same method of verification (HTML file, meta tag, or DNS) on the new site to simplify this step. If your old verification files or tags are lost in migration, re-add them to the new site to avoid losing Search Console data. -
Update internal links, media, and sitemaps.
Before going live, ensure that your new site’s internal links and sitemaps point to the new domain. If your content uses absolute URLs (like images or internal links hard-coded to the old domain), update them.-
WordPress sites: Use a search-and-replace tool or plugin (for example, “Better Search Replace” or similar) to replace all instances of the old domain with the new domain in the database. Also go to Settings → Permalinks and save to rebuild rewrite rules. Regenerate any XML sitemaps (many SEO plugins do this automatically).
-
Custom sites: Edit your code or database accordingly. If you have a templating system, update the base URL variable. Manually update links in HTML, CSS, or JavaScript if needed. Create a new XML sitemap that lists all new URLs (tools or plugins can generate this).
-
Check canonical tags: Ensure any
<link rel="canonical">tags on your new pages point to the new URLs, not the old domain. -
Robots.txt: Verify your robots.txt on the new site allows crawling of all important paths (and disallows none that shouldn’t be disallowed).
-
-
Implement 301 redirects on the old domain.
Now set up permanent redirects so that every old URL points to the corresponding page on the new domain. This is crucial for passing SEO value and avoiding 404 errors.-
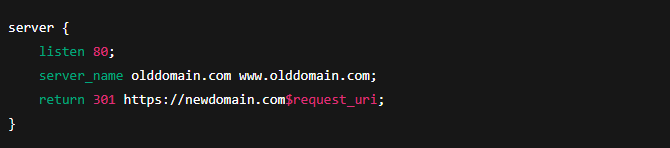
At the domain level: If your hosting or DNS provider offers domain forwarding with 301, you can use that for very simple mappings (e.g., olddomain.com → newdomain.com). However, it’s usually better to handle redirects on the web server for full flexibility.
-
Apache (.htaccess) example:

This redirects all requests from olddomain.com (with or without www) to the same path on newdomain.com with HTTPS.
-
Nginx example:
-
WordPress plugin: If you use WordPress on the old domain, plugins like “Redirection” or SEO plugins (All in One SEO, Yoast, etc.) often have a “full site redirect” feature. These allow you to enter the new domain and handle the 301 redirects automatically without editing .htaccess. For example, one-click “Relocate Site” toggles in popular SEO plugins achieve a site-wide redirect to the new domain.
-
Verify one-to-one mapping: Each old page must map to a new page. If you changed the URL structure (for example, renaming
/blog/to/news/), specify the exact mapping. Avoid redirect chains (old → middle → new); redirect straight from old to final URL.
After setting up redirects, test a few important URLs manually in a browser or with a redirect-checking tool. Make sure
oldurl.com/exampleloadsnewurl.com/exampleand shows an HTTP 301 status. -
-
Submit Change of Address and sitemaps in Google Search Console.
In your old-site Search Console property, use the Change of Address tool to tell Google that your site has moved to the new domain. This step explicitly signals to Google that all the content from the old domain is now on the new domain, helping the transfer of search engine signals. (Note: if the only change was HTTP→HTTPS on the same domain, you do not need Change of Address; it’s only for domain or significant domain-prefix changes.)Then, in Google Search Console (and Bing Webmaster Tools, if applicable) do the following:
-
New domain GSC: Submit your new XML sitemap(s). This allows Google to quickly discover all the new URLs.
-
Old domain GSC: You can keep the old sitemap or remove it; Google is aware of the redirects.
-
Sitemap updates: After submitting, monitor the indexing report. Over time, pages from the old sitemap will drop and new domain pages will appear. Some warnings about “URL in sitemap redirects” are expected and can be ignored because you have moved to new URLs.
-
-
Launch and monitor immediately.
When you’re ready (likely during off-peak hours), update DNS so the new domain goes live on the right hosting. Your old domain should now serve only 301 redirects. Keep the old site’s server running to catch any remaining traffic or bots. Immediately:-
Check site health: Verify the new domain works, the old domain redirects correctly everywhere, and that no URLs return 404 or 5xx errors unexpectedly.
-
Remove staging blocks: If your staging site had any password protection,
noindex, or disallow rules, remove them so Googlebot and visitors see the new site content. -
Update analytics and ads: Ensure your Google Analytics (or other analytics) tracking code is present on the new site. If you run ads, update landing page URLs.
-
Update external references: Wherever your domain is listed (social media profiles, Google My Business, email footers, newsletter templates, etc.), update to the new domain.
-
-
Post-launch validation and troubleshooting.
In the days and weeks after launch, use tools to ensure everything is working:-
Google Search Console: Monitor the Coverage and Sitemaps reports. You should see indexed URLs increasing for the new domain and dropping for the old. Watch for crawl errors (e.g., “Redirect error” or “Not found”). The Performance report will show impressions and clicks shifting to the new domain’s pages.
-
Server logs/analytics: Keep an eye on your web logs for unexpected 404s or spikes in bot traffic. Use Google Analytics to confirm that traffic is moving to the new domain (the old domain’s traffic should taper off, indicating users are being redirected). Google Analytics real-time view is useful immediately after launch to watch incoming visits.
-
Manual QA: Use a site crawler (like Screaming Frog, a paid SEMrush Site Audit, or similar) to crawl the new site. Compare it to the old site crawl to ensure no pages are missing. Check that the canonical tags on new pages reference the new domain.
-
External links check: Use the “Links” section of Google Search Console or a backlink tool to identify your top linking domains. Consider contacting any high-authority sites with important backlinks to request an update to the new URL (especially if those links currently lead to 301 redirects). While redirects preserve link equity, updating backlinks cleans signals.
-
Keep the old domain. Maintain ownership of the old domain and keep all 301 redirects in place for at least one year, preferably indefinitely. Users and bots may still access the old domain years later, and you want them to reach your content, not a dead site. This also prevents squatters or spammers from hijacking your old domain.
-
WordPress vs. Custom (Non-CMS) Migrations
WordPress Sites
WordPress makes some tasks easier thanks to plugins, but you still need to follow the same principles. Key considerations for WordPress migrations:
-
Update Site Address. In the WordPress dashboard, go to Settings → General and change the WordPress Address (URL) and Site Address (URL) to the new domain. This tells WordPress that the site’s home has moved.
-
Use a Migration or Search-Replace Tool. If you copy the database over, use a tool or plugin to replace all instances of the old domain in your database with the new one. Plugins like Better Search Replace or the built-in “Search & Replace” features in some SEO plugins can handle this. Alternatively, use WP-CLI’s
search-replacecommand. This updates URLs in posts, pages, and settings so you don’t end up with mixed domains in your content. -
Redirect Plugin Option. For the old WordPress site, install a redirection plugin if you prefer not to edit .htaccess manually. Many popular SEO plugins (All in One SEO, Yoast, etc.) or the standalone Redirection plugin have a “Full Site Redirect” option. You simply enter the new domain, and the plugin creates 301 redirects for every page. This is especially handy if you’re not comfortable editing server config.
-
Permalinks and Caching. After making changes, go to Settings → Permalinks and save (even if you don’t change anything) to flush the rewrite rules. Clear any cache (from plugins or server) so that the new URLs and redirects are active immediately.
-
SEO Plugin Settings. If you use an SEO plugin that manages your sitemap or meta, check that it points to the new domain and regenerate the sitemap. Some plugins might store the site URL in settings, so review those.
Custom or Non-CMS Sites
If your site is hand-coded or uses a less-common CMS, the principles are similar but you may need to handle more manually:
-
Server Configuration. Set up 301 redirects at the web server level as shown above (.htaccess, Nginx, or other server config). If your host has a control panel, it may offer redirect tools. Ensure the redirect covers all URLs.
-
Update Site Settings. If your site’s configuration (in PHP, Laravel, Node.js, etc.) has a base URL or domain setting, update it to the new domain.
-
Database Changes. For dynamic sites with a database (e.g., a custom CMS or e-commerce platform), perform a database search-and-replace for the old domain, similar to WordPress. Many platforms have command-line tools or scripts for this purpose.
-
Static Content. If your site is static HTML/CSS/JS, simply replace or rebuild the site files with the new domain, and set up the redirects. Make sure any hard-coded links (in templates, stylesheets, or scripts) are updated.
-
DNS TTL and Migration. Consider lowering the DNS TTL (time-to-live) a few hours before launch so that the switch to the new domain propagates faster. If using a CDN or proxy, clear caches there too.
In all cases, test thoroughly. Use browser developer tools or curl to check that old URLs issue a 301 and lead to the correct new URL. For example:

should show a 301 Moved Permanently and a Location: https://newdomain.com/page header.
Essential Migration Checklist
Before and after launching your domain migration, use this checklist of key tasks to ensure nothing is missed:
-
Audit and Backup: Back up the old site (files and database). Note current rankings, traffic, and top URLs.
-
Domain Cleanliness: Verify the new domain has no penalties and good link history.
-
Setup New Site: Copy all content to the new domain. Install SSL and ensure the site functions correctly. Remove any “noindex” or block settings.
-
Search Console: Add and verify all variants of the new site (http, https, www, non-www) in Google Search Console. Also ensure the old site is verified.
-
Internal Links: Update all internal links and references to use the new domain. Update canonical tags and schema markup if they include the domain.
-
Sitemaps: Generate an XML sitemap for the new domain and keep a copy of the old sitemap for reference.
-
301 Redirects: Implement 301 redirects from every old URL to the corresponding new URL. Cover the entire domain (including homepage).
-
Change of Address: In Google Search Console for the old domain, submit a Change of Address pointing to the new domain.
-
Submit Sitemaps: In GSC, submit the new sitemap under the new site property.
-
Robots.txt: Update or remove any old robots.txt that blocks content. On the new domain, ensure robots.txt is correct (typically allowing crawling).
-
Analytics Update: Install your analytics tracking code on the new site. Update any settings or properties that reference the domain.
-
Test Everything: Before going live, test redirects, page loading, links, forms, and functionalities on the new domain.
-
Monitor Post-Launch: After launch, monitor Google Search Console for indexing status, coverage issues, or warnings. Check Analytics for traffic trends.
-
Keep Redirects Long-Term: Plan to keep the old domain’s redirects active for at least 6–12 months, ideally permanently, to preserve SEO equity and user bookmarks.
-
Update Backlinks and Profiles: Reach out to key external sites and update your domain in profiles, business listings, and high-impact backlinks if possible.
-
Crawl Checks: Periodically re-crawl the site (or use tools) to catch any broken internal/external links or missing pages.
Before-and-After URL Examples
The table below shows example mappings of old URLs to new URLs and the redirect used. Adjust according to your own URL structure.
| Old URL | Redirect Type | New URL |
|---|---|---|
http://olddomain.com/about |
301 Permanent | https://newdomain.com/about |
http://olddomain.com/blog/123 |
301 Permanent | https://newdomain.com/blog/123 |
http://olddomain.com/shop |
301 Permanent | https://newdomain.com/store |
http://olddomain.com/ |
301 Permanent | https://newdomain.com/ |
Note: Always use 301 (permanent) redirects for domain moves. In the example above, visitors (and search engines) going to any page on olddomain.com will be sent to the matching page on newdomain.com. If you change URL paths (e.g.
/shopto/store), the redirect should point to the new path exactly as shown.
Monitoring SEO After Migration
Even after the move is complete, continued monitoring ensures your SEO stays on track and any issues are caught early.
-
Watch Search Console Reports: In the weeks after launch, regularly check the Index Coverage report to see new pages being indexed and old ones dropping. The Performance report will show queries and clicks for both domains; over time, impressions and clicks should shift entirely to the new domain. An unusually large drop in impressions or a spike in errors needs investigation.
-
Track Organic Traffic: Use Google Analytics (or your analytics platform) to compare organic traffic before and after the move. Expect a dip and gradual recovery. If traffic doesn’t recover as expected after a few weeks, dig into Landing Pages and compare which pages lost traffic. This can indicate if some redirects or pages are missing.
-
Check Crawl Errors: Look at the Coverage section in GSC for any crawl errors (404s, redirects, server errors). Fix any pages that should exist or set up additional redirects for any important missing pages.
-
Log File Analysis: If you have access to server logs, examine requests to the old domain. Ensure bots (especially Googlebot) are receiving 301s and not 404s. A persistent “Not Found” on an old URL suggests a redirect is misconfigured.
-
Monitor Rankings: Use a rank tracking tool or manual searches to see if your key keywords and pages are still ranking similarly after the migration. Small fluctuations are normal, but watch for any major drop that doesn’t recover.
-
Re-apply SEO Best Practices: Now is a good time to review SEO on the new site. Ensure meta tags, schema, page speed, mobile usability, and content quality are solid. A domain move is an opportunity to improve the site further.
-
Keep Building Links on New Domain: Encourage link acquisition on the new domain (guest posts, partnerships, social shares) to strengthen its authority. Redirects pass link equity, but direct links to your new domain are even better.
-
Regular Maintenance: For the first few months, check your site periodically (weekly or biweekly) for technical issues. Eventually, you can integrate this into your normal SEO maintenance routine.
By following this comprehensive process—careful planning, proper redirects, and diligent monitoring—you can move your site to a new domain without sacrificing its hard-won SEO value. Keeping detailed records of each step and being patient with the natural indexing timeline will help ensure that your site’s rankings and traffic stabilize and even improve on the new domain.